Showing posts with label baking. Show all posts

28 May 2012

Nostalgic Cherry Pie

Ah, patriotism.  For me, the term conjures images of American folk and poster art as well as memories of Midwestern flea markets and lemon shake-ups.  When gifted with a national holiday/vacation day, I relish the extended time available to bake!  Following a Friday errand, Mr. Trek brought home a lovely bag of sweet cherries as a treat for moi, Ms. Trek.  Ordinarily, I will devour the entire bag in nothing short of 48 hours.  However, noting the approach of said holiday, I inquired as to what cherry creation he might enjoy. “Cherry pie,” was the honest response.  Always fearing the straight and narrow path, I began searching for cherry/various fruit pies, tarts, cobblers, galettes and other miscellany.  Ultimately, the heart of this baker just couldn’t shake the idea of a wholesome, mouth-watering cherry pie.  There’s something nostalgic about it all, just like the aforementioned poster art.  Maybe I’ll feel as tough as Rosie the Riveter after enjoying a piece of this treasured part of our American culinary heritage!

Notes: I used Julia Child’s recipe for Flaky Pie Dough and found that I had enough dough for a double crusted pie as well as one more, open-faced or lattice-topped pie.  Keeping with the traditional theme, I decided to use the lattice-top for this pie and freeze the other dough (in plastic – freeze for up to one month) for later use.  Julia offers three options for crafting the dough: by hand, mixer (with paddle attachment), and a food processor.  Usually, I go with the old-fashioned, hand-crafted method, but decided to fit the ol’ KitchenAid with her paddle attachment and make quick work of said dough.  I wasn’t entirely pleased with the way it came together, so I’ll most likely go back to my favorite method for the next pie/galette.  Some of Julia’s tips for ‘Perfect Pie Dough’ are as follows:

- Always use unsalted butter and make sure it is extremely cold.  Cut it into 1/2 inch cubes before adding it to the flour.

-Use a pastry blender (or your fingertips) to cut the butter into the flour.  Work as quickly as you comfortably can and stop when the mixture resembles coarse crumbs.

-Keep the liquid icy-cold.  Add it a spoonful at a time, using a fork to toss the mixture and incorporate the liquid into the dough.  When the dough has curds & clumps that stick together when pressed lightly between your fingers, it’s just right.  If you have any doubts, keep in mind that it’s better to add too much liquid than too little; too little, and the crust will be dry and difficult to roll.

-Gently gather the dough into a round and flatten it into a rough approximation of the shape you’ll be rolling it into.

-Chill it – at least 30 minutes – in the refrigerator.  This rest gives the gluten (the protein that forms webs in flour) a chance to calm down so that when you start to roll the dough, it won’t spring back.

-Chill the crust after you’ve gently worked/centered the dough into the pan.  The gluten needs another chance to relax.

In regard to the filling, I used fresh, sweet cherries.  The pitting process is simple with a bowl for pits and a paring knife, but can even be easier with a cherry pitter.  Mr. Trek and I watched a little HGTV while pitting with paring knives and, twenty minutes later, we were finished!  Some people have an aversion to tapioca in their pie filling, and I would recommend replacing it with cornstarch as a thickener. 

Nostalgic Cherry Pie

Crust – Recipe Courtesy of Baking with Julia12cherry_pie2012

5¼c pastry flour or all-purpose flour

1T kosher salt

1½ sticks (6oz) cold unsalted butter, cut into small pieces

1¾c (11oz) solid vegetable shortening, chilled

1c ice water

FillingAdapted from allrecipes.com

4T quick-cooking tapioca14cherry_pie2012

1/8t salt

1c sugar

¼t almond extract

½t vanilla extract

4c pitted, sweet cherries

1½T unsalted butter, cut into small cubes

Milk and sugar for coating the top of the pie

Procedures9cherry_pie2012

1. Prepare crust in advance (at least two hours but, preferably, overnight). Combine flour and salt in a stand mixer using the paddle attachment. Add the cold bits of butter and continue on low speed until the mixture is crumbly/coarse. Add the shortening, a wee bit at a time, until the mixture is clumpy and curdy and holds together when a small bit is pressed between your fingers. Add the water and mix only until it is incorporated. Turn the dough out onto a work surface and fold it over onto itself two or three times, just to finish the mixing and gather it together. Divide the dough in quarters, wrap in plastic and refrigerate (it will keep for five days in the fridge, or one month in the freezer) for at least two hours.4cherry_pie2012

2. Preheat oven to 425°. Roll out the crust to fit a 9” pie plate and assemble in the style you prefer. Here is a link to a video providing instruction for creating a lattice-top pie. Refrigerate the bottom crust in the pie plate to allow the gluten to rest. Meanwhile, begin the filling!

3. Combine the tapioca, salt, sugar and extracts in a medium-sized mixing bowl. Add the pitted cherries and toss to coat with the sweet-smelling sugar concoction! Turn the cherry mixture into the chilled pie plate o’ dough. If creating a lattice or top to the pie, do so now. Otherwise, try an open-faced pie. Be sure to make a mound of filling toward the center of the pie.1cherry_pie2012

4. Brush the top with milk and sprinkle with sugar.

5. Bake the pie at 425° for 15 minutes, then reduce the heat to 375°. Bake for an additional 50 minutes or until the filling in the middle begins to bubble, bubble, toil and trouble. Keep an eye on the crust and wrap the edges with foil if they begin to brown too quickly.

6. Take your masterpiece out of the oven, thank it for making your kitchen smell so dreamy, and enjoy!

18 February 2012

I ‘Mustache’ You to Try a Cupcake…

A cupcake client obtained my donated auction item from my friend’s very special event (a fundraiser for her father – recently diagnosed with ALS) so I was able to get my creative juices flowing!  When asked what her preference for flavor would mustachesbe, the answer was simple: chocolate!  My go-to chocolate cupcake recipe is divine.  It is none other than Giada DiLaurentis’ Chocolate Chip Mascarpone Cupcakes Topped with Ganache.  Is your mouth watering, yet?  Oh my stars…each little bite is moist with a chocolate chip surprise every so often.  It’s just rich enough to satiate every palate.  Divine, I tell you.  Divine. 

In addition to selecting this tasty flavor, the client requested decorations that would be a bit whimsical in celebration of her older brother and sister – a tandem birthday party!  Mr. Trek and I , as seen above, have a fondness for all that is whimsical and that clearly includes mustaches!  I found a variety of molds online, allowing for a multitude of mustache choices.  Note: I’m happy to put them to use again, so just let me know if you’re in need of some chocolate lips or mustaches!

Chocolate Chip and Mascarpone Cupcakes

Recipe courtesy Giada De Laurentiiscupcakes_2338

Yield: 2 dozen

Ingredients

Cupcakes:

5 oz unsweetened chocolate, chopped

1 c water

1/3 c mascarpone cheese, at room temperature

2 1/4 c sugar

1 c vegetable oil

3 large eggs

1 T vanilla extract

3 c all-purpose flour

1 t baking soda

1 t fine sea salt

1/2 t baking powder

1 c (6 oz) semisweet chocolate chips (recommended: Nestle morsels)

Ganache:

· 1 cup (6 oz) semisweet chocolate chips (recommended: Nestle morsels)

· 2/3 cup heavy whipping cream

· 1/2 teaspoon vanilla extract

· Special equipment: 2 (12-count) muffin pans with paper liners

Procedure

Cupcakes:

Place an oven rack in the center of the oven and preheat to 325°F.

Combine the unsweetened chocolate and water in a small saucepan over medium-low heat. Stir constantly until the chocolate is melted, about 2 minutes. Cool for 2 minutes. Whisk in the mascarpone cheese until the mixture is smooth.

Beat the sugar, oil, eggs, and vanilla in a large bowl for 30 seconds. Stir in the mascarpone mixture. Whisk the flour, baking soda, salt, baking powder, and chocolate chips in a medium bowl. Add the dry ingredients to the chocolate mixture. Stir until just blended.

Divide the batter among the prepared muffin pans. Bake for 20 to 25 minutes or until a tester inserted into the center of a cupcake comes out with no crumbs attached. Cool the cupcakes completely before dipping, about 1 hour.

Ganache:

Place the chocolate chips in a small bowl. Combine the heavy cream and vanilla extract in a small saucepan over medium-low heat. Cook until small bubbles appear on the outside edge of the cream. Pour the hot cream mixture over the chocolate chips. Using a fork, gently stir until all the chocolate is melted and the mixture is smooth.

Dip the tops of each cupcake in the ganache and transfer to a baking sheet. Place the dipped cupcakes in the refrigerator to set, about 15 to 20 minutes. Allow cupcakes to return to room temperature before serving.

Note: For puffier cupcakes allow the batter to rest in the muffin pans for 20 minutes before baking.

26 January 2012

Pineapple Zucchini Bread: An unexpected + delightful Discovery

There’s something special about zucchini bread. Is it the shifty look that you get from a curious pal, seemingly scolding you with, “No thanks, I don’t like veggies hiding in my sweet treats” or that you are just suspicious of all words that start with the penultimate (i.e. most pretentious) letter in the alphabet?  Well, fear not!  This recipe is for your nay-sayin’ pals as well as all of the veteran, zucchini-bread fans.  The pineapple is the unexpected delight, keeping this bread sweet (but not in excess) and moist (while still maintaining firmness) all the live-long week.  Well, maybe not a week…it will be devoured quicker than you can say, “Zacharia Zebra played the zither as he twirled -
zigging and zagging all ‘round the world!  In fact, it didn’t last long enough for a photograph!  One loaf went to the teacher’s lounge, and Mr. Trek + I snorkled down every last crumb of the second loaf within just a few days!  There’s an excellent shot of the treat over at Simply Recipes, if my step-by-steps aren’t enough to inspire you to immediately put this in your oven and bake it!

Simply Recipes – Zucchini Bread with Pineapple

3 eggsJanuary2012 019

1 cup olive oil

2 cups sugar

2 teaspoons vanilla

2 cups coarsely grated zucchini

1 can (8oz) crushed pineapple, drainedJanuary2012 038

3 cups all purpose flour

2 teaspoons baking soda

1 teaspoon salt

1/2 teaspoon baking powder

1 1/2 teaspoon cinnamonJanuary2012 048

3/4 teaspoon nutmeg

1 cup chopped walnuts

1 cup raisins

METHOD

Preheat oven to 350°F. In a mixer, beat eggs. Add oil, sugar, and vanilla; continue beating mixture until thick and foamy. With a spoon, stir in the zucchini and pineapple.

In a separate bowl, combine flour, baking soda, salt, baking powder, cinnamon, and nutmeg. A third at a time, add dry ingredients into wet and gently stir (by hand) after each addition. Add the walnuts and raisins, blend gently.

Divide the batter equally between 2 greased and flour-dusted 5 by 9 inch loaf pans. Bake for 1 hour or until a wooden pick inserted in to the center comes out clean. Cool in pans for 10 minutes. Turn out onto wire racks to cool thoroughly.

Yield:  2 loaves.

Adapted from a 1974 Sunset Magazine recipe, quoted on Simply Recipes

06 November 2011

Hey, Blondie! Pumpkin, chocolate + hazelnut blondies, that is!

‘Tis the season for pumpkins, pumpkins, pumpkins!  I can’t seem to get enough squash at this time of year, as you’ll see in some upcoming posts.  This recipe, from Smitten Kitchen, was happened-upon while perusing Pinterest for something new to create from this seasonal, golden gourd.  As the initial blogger indicated, it lacked in being thoroughly present in pumpkin or chocolate spirit.  Never fear!  This is what leftover ganache, freshly ground nutmeg and chopped hazelnuts are for! If you don’t have any ganache on hand, melt some milk-chocolate morsels and drizzle those over the top.  VoilĂ !  A perfectly decadent fall treat! 

14 March 2011

The Wonderful Wizard of Oz

Charlotte, the multi-talented Social Committee chair, asked me to make a cupcake creation to accompany the ‘Wizard of Oz’ birthday spread for our Lower School faculty/staff.  My immediate response was, “Of course!!! It’s my favorite film, and I’m such a fan of the Baum books!” Ah, yes…it was only a few moments later that I realized that they would be required at approximately the same time as parent-teacher conferences/conference-note writing and such craziness.  However, I couldn’t pass on this opportunity!  I found a blog posting at Baking Bites for rainbow cupcakes and I just had to try them!  My culinary confidantes, just mixing/pouring these lovely treats was a process.  It took close to an hour to prepare them for baking, and they were overflowing quite a bit!  Muffin tops, muffin tops, muffin tops – oh, my!  Needless to say, they were too moist upon retrieving them from the oven, so I put them in the freezer to firm up just a bit.  Only two were salvageable enough that I felt comfortable serving them to colleagues.  Due to the moisture added from the gel coloring, they were super-duper tasty, but too soft to hold their shape.  If/when I choose to recreate these little darlings again (anyone need LGBT/PRIDE cupcakes?), I shall reduce the amount of oil called for in the recipe, and use only 2t (rather than 1T) per color when layering the batter in each well.  Oh, and silicon liners would be preferred.  In the end, I chose to create chocolate ‘munchkin cupcakes’ and decorated them with white buttercream and a few fondant friends from Oz.  The ‘Accident in Munchkinland’ cupcake (photo to be added soon!) was inspired by another post I found online – so much fun!

06 March 2011

Veggie Shepherd’s Pie…Divine!

Some recipes just beckon to you and whisper, “Reinvent me, I beg of you!  Add your own lil’ flair!”  Mollie Katzen can do no wrong, especially in the sense that her recipes seem to welcome creativity.  Exhibit A: Vegetarian Shepherd’s Pie.  I took this recipe from a fellow blogger’s adapted version taken from Mollie’s exceptional book, The New Enchanted Broccoli Forest and added a little bit of my own twist.  My adaptations* are included below.  Please note: this is the most  delectable, comforting, cozy, pajama-friendly feast you may ever enjoy.

Vegetarian Shepherd’s Pie

Tater Topping (make first):
2 large potatoes
1T butter (or oil)
½c milk
3 large cloves garlic, minced
salt & pepper, to taste
½c minced fresh parsley
Veggie Hash:
1T oil & 1/3c dry red wine*
1½c minced onions
4 large cloves garlic, minced
1t salt
fresh black pepper to taste
1 med. celeriac (celery root), finely minced*
1 lb mushrooms, chopped (prefer Cremini & baby Bellas)*
2 small Mexican squash*
1 medium bell pepper, minced
2t dried basil
½t dried thyme
½t dried oregano
1-1½c soy crumble*
3/4 cup grated cheddar cheese (leave out to make vegan)
cayenne to taste
paprika
Make the Tater Topping:
Peel or scrub the potatoes, and cut them into 1 inch chunks. Cook in plenty of boiling water until soft. Drain and transfer to a medium-large bowl. Add butter, garlic, and milk, and mash well. Add salt and black pepper to taste, and stir in the parsley. Set aside.
Make the Veggie Hash (and assemble the pie):
1. Preheat oven to 350°F. Have ready a 2 quart casserole or its equivalent (ex. a 9x13 baking pan).
2. Heat the oil in a large, deep skillet or a Dutch oven. Add the onion, and sauté over medium heat for about 5 minutes, or until it begins to soften.
3. Add garlic, salt, pepper, celery root, mushrooms, squash, and bell pepper. Stir until well combined, cover, and cook over medium heat for about 10 minutes, stirring frequently. Add the herbs, stir, and cover again. Cook for about 5 more minutes, or until the squash is perfectly tender. *Deglaze with wine mixture by stirring and scraping up any browned bits.  Let cook until simmering and slightly thickened, about 3 minutes.  Remove from heat.
4. Stir in the soy crumble and cheese. Add cayenne to taste. Transfer this mixture to the casserole or baking pan, and spread it out.
5. Spoon and./or spread the mashed potatoes completely over the vegetables. *Rough up the surface of the potatoes so there are bits that will get browned and crunchy.  Dust generously with paprika.
6. Bake uncovered for 25 to 30 minutes, or until lightly browned on top and bubbly around the edges.

17 June 2010

Pine Street Bakery

Edgewood, Texas

It's no secret, this is a must stop on any visit to the family farm.  Jennifer is a self-taught culinary delight, and her quiches and all baked goods never fail to make any visit superb!  I'm not quite sure what was in her *amazing* chocolate cake, but it inspired me to bake one for this upcoming weekend.  Stay tuned...

18 May 2010

The Very Hungry Caterpillar

Cake inspired by the book by Eric Carle

Created for the Lower School faculty birthday celebration in May.

The fondant was tinted by hand, resulting in a marbled, red color.  All other details were created in fondant as well, covering chopsticks for antennae and then painting toothpicks for the bristles on the caterpillar's back.  This was probably one of my quickest cake-creations, because report cards were due that week!

09 April 2010

Godfather & Cannolis

cannoli

"Leave the gun. Take the cannolis." 

I have never seen 'The Godfather.' (Gasp) Enter Sam and a copy of this classic film, with a promise from me to make a fabulous Italian dinner, complete with fresh cannolis. I headed to the Hillcrest Farmer's Market to pick up fresh, garlic-basil fettucini and walnut pesto from the divine owner of Lisko Imports to cook as a main course, and asked him if he knew where I could find cannoli shells. "How many do you want? I'll bring them by your house when I'm in the neighborhood tomorrow morning; my treat." Free cannoli shells!? Whoa. Sure enough eighteen, lovely, golden, crisp cannoli shells were left in a bag on my porch the next morning. Michael Chiarello’s recipe was used to craft the dessert as a tribute to The Godfather. Loved the film, loved the cannolis, will need to top this for The Godfather II. Any suggestions?

21 March 2010

Baby Shower Cupcakes – Groovy Owls!


jenna_cake_cupcakes T & J are two of the sweetest people I know in Sandy Eggo, and everyone was so jazzed as they prepared to welcome their new baby, Maya, into the world with a shower at Kate Sessions Park. 

It was my first visit to the park, and Chauncey, Sam, & I were digging the ocean views and kite-flying breezes!  The theme was inspired by ‘Bumpto’s’ nursery design: owls!  All of the embellishments were created out of fondant, except the sugar eyes which were created by the lovelies at Do It With Icing.  Between the two of us, Sam and I created somewhat of an assembly line to make a plethora of owls and details for the cupcakes and cake.

jenna_cake_cupcakes2


11 October 2009

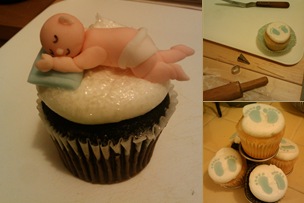
Baby Shower Cupcakes!

I was so excited to make cute lil' cupcakes for Molly's baby shower!   The footprints were cut from fondant using an oval cutter and then re-shaped to resemble a foot.  I used a small decorating tip to cut the 'toes' and placed them on each cupcake one at a time.  The baby was molded out of fondant as well, with a large moon cut from yellow and sprinkled with cake crystals (glitter).  However...it sort of melted en route to school that morning, so it didn't make it on the top.